Guides · Tutorial
Security in PowerBuilder: hashed passwords, two-factor sign-in, encrypted files, API tokens
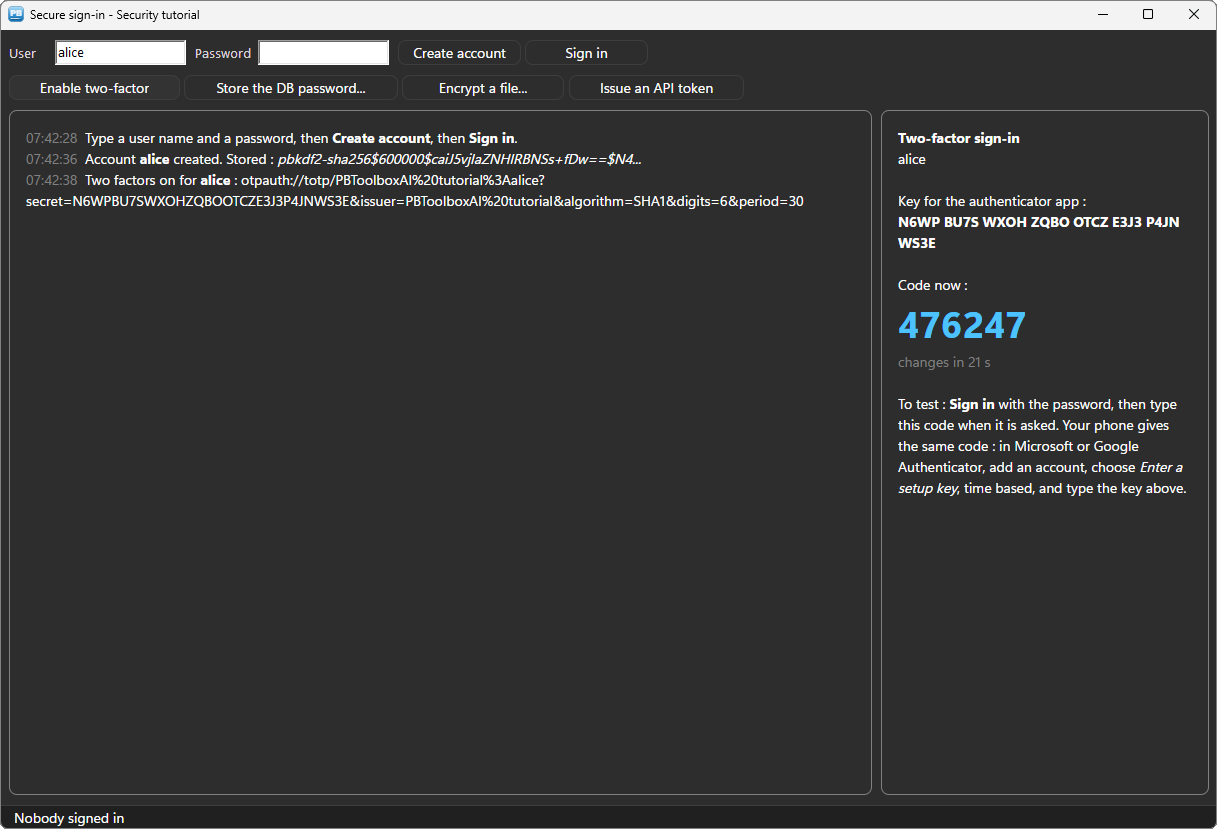
Many PowerBuilder applications still store passwords in clear text, or with a home-made scramble, keep the database password in an INI file, and have no two-factor sign-in. Auditors notice, and so do the customers' IT departments. The reason is rarely negligence: PowerBuilder 10 to 12.6 have no cryptography to speak of, and calling a .NET assembly or an external tool from them is a project of its own.
This tutorial does it in PowerScript with n_pbt_crypto of PBToolboxAI: passwords stored as salted hashes, a two-factor sign-in with the codes of Google Authenticator or Microsoft Authenticator, a server password kept by Windows, a file encrypted with AES-256, and a signed API token (JWT). It works from PowerBuilder 10.2 to 2025, with no third-party DLL and no service: the cryptography of the WebView2 engine and of Windows itself.
Every line of code below comes from the sample application: the window w_tuto_security of the PBToolboxAI demo, opened by its Tutorials tab.
What you need #
- PowerBuilder 10.2 → 2025 (32 or 64 bit).
- Windows 10 or 11: the Microsoft WebView2 runtime is already there.
- The PBToolboxAI demonstration package — free, from the downloads page. It holds
pbtoolboxai.pbl,pbtoolboxai.dlland the sample application of this tutorial.
The finished code. Open
pbtoolboxai_demo.pbwfrom the demonstration package and run it: the Tutorials tab of its ribbon opens the sample of this tutorial, the windoww_tuto_security. Its source is inpbtoolboxai_demo.pbl, ready to read or to copy.Demo mode. In your own application, without a licence key, the cryptography runs in demo mode: texts of 2,048 characters and files of 2,048 bytes at most. Everything else works.
Step 1 — One object for the window #
Copy pbtoolboxai.pbl and pbtoolboxai.dll into your application as in the other tutorials, and set the licence in the open event of the application object. Then the window creates one n_pbt_crypto and keeps it:
// Instance variables of the window
// The cryptography : one object for the window, created in open
n_pbt_crypto inv_crypto
// open event of the window (extract)
// The cryptography works for this window (its licence is checked on the window's
// class) ; its hidden page is created now, so the first click pays nothing
inv_crypto = create n_pbt_crypto
inv_crypto.ipo_owner = this
inv_crypto.of_open()// close event of the window
destroy inv_cryptoipo_owner says who the object works for: the licence is checked on that class. of_open is optional — every method opens what it needs — but calling it when the window opens pays the start-up once.
Step 2 — Never store a password #
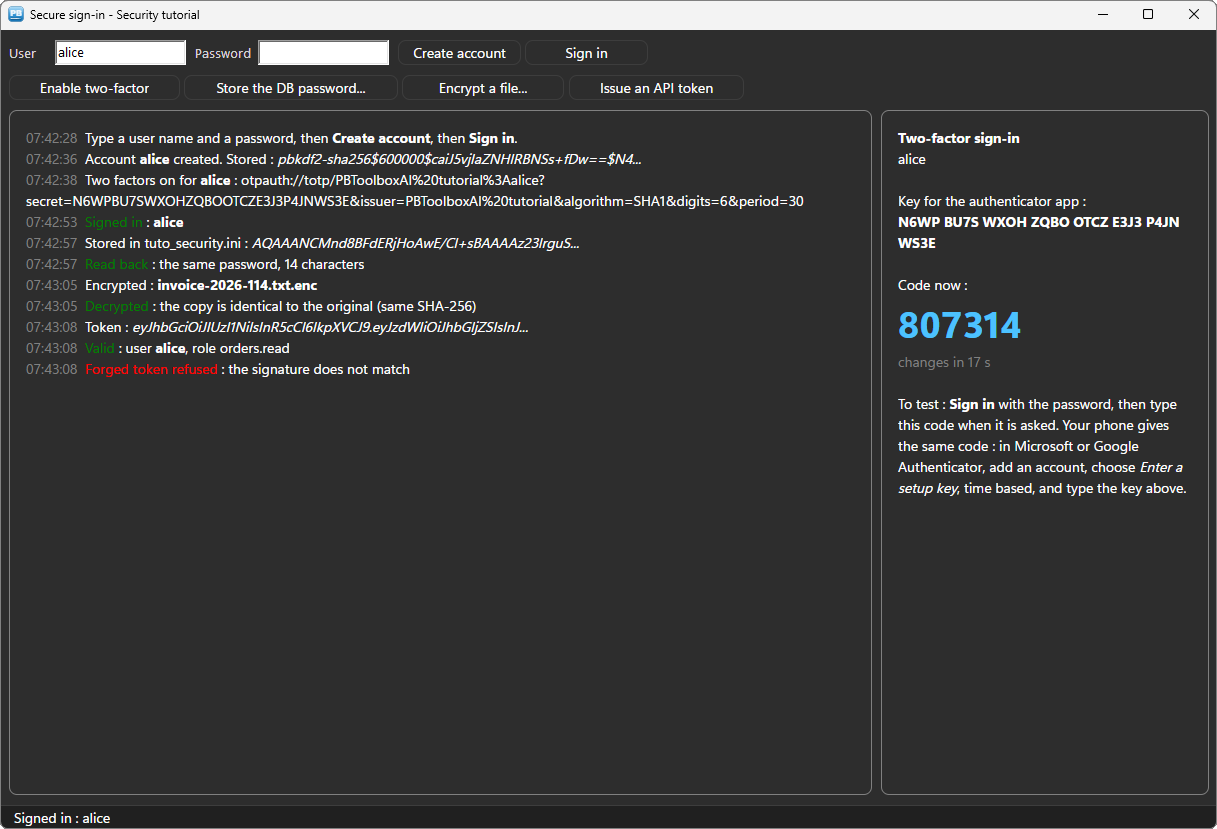
A password is never stored, not even encrypted: what goes in the users table is a hash of it, salted and slow to compute, so that a stolen table gives nothing back. of_password_hash does all of it — 600,000 rounds of PBKDF2, a random salt, and both written in the value itself:
// wf_register () (extract)
// What is STORED : a salted hash, 600,000 rounds of PBKDF2. Never the password,
// and never the same hash twice, even for the same password.
ls_hash = inv_crypto.of_password_hash(/*password*/ sle_password.text)
At sign-in, the typed password is checked against that value — there is nothing to decrypt:
// wf_sign_in () (extract)
// The typed password against the stored hash. An unknown user and a wrong password
// get the SAME answer : the screen tells an attacker nothing.
if ll_user = 0 then
	wf_log("[red]Sign-in refused[/red] : unknown user or wrong password")
	return
end if
if not inv_crypto.of_password_verify(/*password*/ sle_password.text, /*stored*/ is_hashes[ll_user]) then
	wf_log("[red]Sign-in refused[/red] : unknown user or wrong password")
	return
end if
The comparison is made in constant time, and of_password_needs_rehash tells, at a successful sign-in, that a hash was made with fewer rounds than today's: the moment to store a new one.
Step 3 — Two-factor sign-in #
The second factor is the six-digit code an authenticator app shows on the user's phone, changing every 30 seconds (TOTP, RFC 6238). Enrolling a user is one secret, stored with the account, and the address an app reads:
// wf_enable_two_factor () (extract)
// Two factors for the account named in the field : a secret, stored with the account
is_secrets[ll_user] = inv_crypto.of_totp_secret()
il_last_steps[ll_user] = 0

// The otpauth:// address is what a QR code carries ; an authenticator app also takes
// the key typed by hand
wf_log("Two factors on for [b]" + inv_utils.of_escape_markup(is_users[ll_user]) + "[/b] : " + inv_utils.of_escape_markup(inv_crypto.of_totp_uri(/*secret*/ is_secrets[ll_user], /*account*/ is_users[ll_user], /*issuer*/ "PBToolboxAI tutorial")))
In Google Authenticator or Microsoft Authenticator, Enter a setup key takes the secret; a QR code of the otpauth:// address does the same in one scan. The sample's card shows the key by groups of four, and the code the app shows now, every second:
// wf_show_code () (extract)
uo_code.is_text = "[b]Two-factor sign-in[/b][br]" + inv_utils.of_escape_markup(is_users[il_code_user]) + "[br][br]" &
	+ "Key for the authenticator app :[br][b]" + Trim(ls_key) + "[/b][br][br]" &
	+ "Code now :[br][size=28][b][accent]" + inv_crypto.of_totp_code(/*secret*/ ls_secret) + "[/accent][/b][/size][br]" &
	+ "[gray]changes in " + String(ll_left) + " s[/gray]"
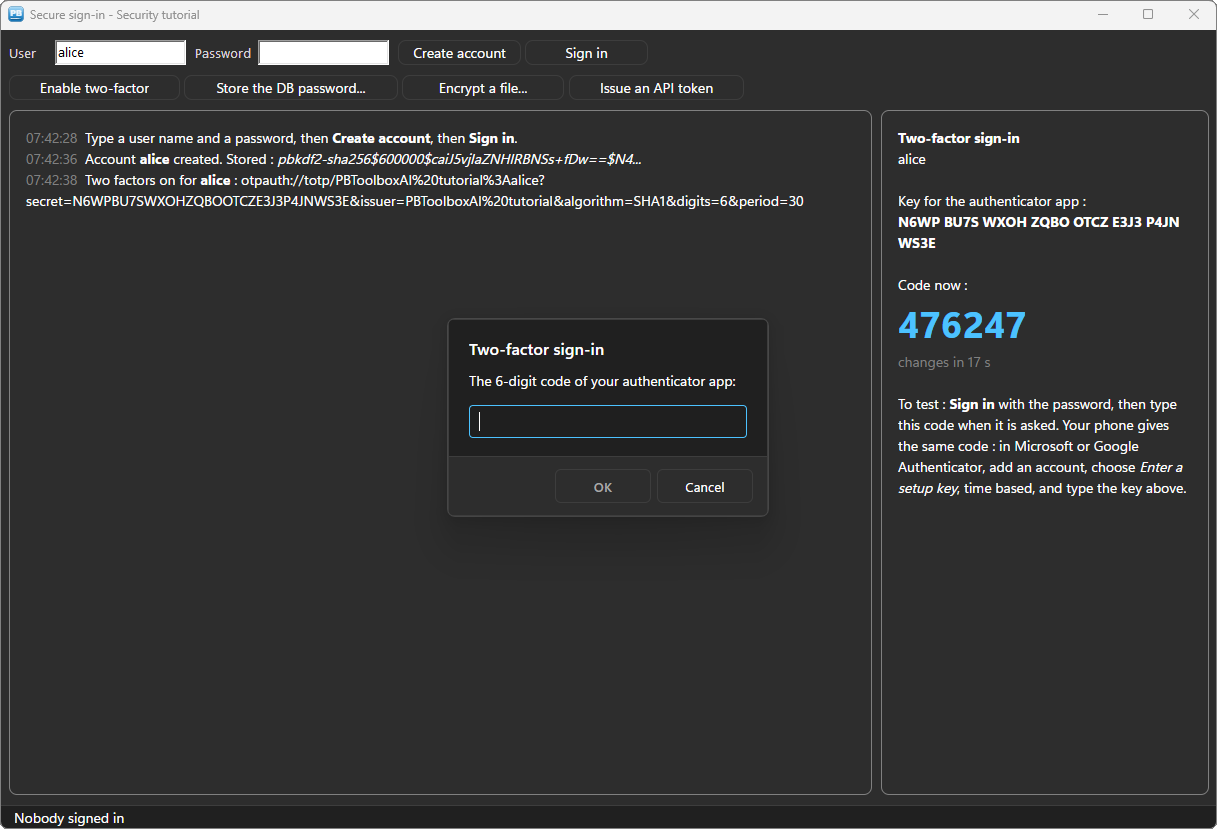
At sign-in, after the password, the code is asked and checked. The step of the code accepted is kept with the account: the same code is never accepted twice, even within its 30 seconds.
// wf_sign_in () (extract)
// Two factors : the six digits of the authenticator app, and never the same code twice
if is_secrets[ll_user] <> "" then
	ls_code = inv_mb.of_prompt(/*hwnd*/ Handle(this), /*title*/ "Two-factor sign-in", /*message*/ "The 6-digit code of your authenticator app:", /*default*/ "", /*password*/ false, /*required*/ true)
	if ls_code = "" then return
	if not inv_crypto.of_totp_verify(/*secret*/ is_secrets[ll_user], /*code*/ ls_code, /*step*/ ll_step) then
		wf_log("[red]Sign-in refused[/red] : wrong code")
		return
	end if
	if ll_step <= il_last_steps[ll_user] then
		wf_log("[red]Sign-in refused[/red] : this code was used already")
		return
	end if
	il_last_steps[ll_user] = ll_step
end if
A code from 30 seconds before or after is accepted too: the clocks of a phone and a PC are rarely exact. inv_mb is the themed message box of the dialogs tutorial.
Step 4 — The database password, kept by Windows #
The application needs the password of its database server, and it ends up in an INI file. Encrypting it with a key written in the source protects nothing: the key is in every copy of the executable. DPAPI, the data protection of Windows, has no key to hide — Windows protects the value for this Windows user, and only that user gets it back:
// wf_protect_setting () (extract)
// What goes in the INI : a value Windows protects for this user (DPAPI), never the
// password. The entropy, a secret of the application, keeps other programs out.
ls_protected = inv_crypto.of_protect(/*text*/ ls_password, /*machine*/ false, /*entropy*/ ENTROPY)

// SetProfileString writes into an EXISTING file only : the first time, create it
if not FileExists(is_ini_file) then FileClose(FileOpen(is_ini_file, LineMode!, Write!))
SetProfileString(is_ini_file, "database", "password", ls_protected)

// At the next start : read it back, with the same entropy
ls_read = inv_crypto.of_unprotect(/*protected*/ ProfileString(is_ini_file, "database", "password", ""), /*entropy*/ ENTROPY)
is_ini_file holds the full path of the INI, set in the open event (GetCurrentDirectory() + "\tuto_security.ini"): with a bare file name, Windows looks for the file in its own folder, where an application may not write. And SetProfileString only writes into a file that exists: the first time, the sample creates it. Without either, the value silently goes nowhere.
ENTROPY is a constant of the application: other programs run by the same user do not know it, so they cannot read the value back. With /*machine*/ true, any account of the workstation can read it — for a service, or a shared PC.
Step 5 — An encrypted file #
of_encrypt_file encrypts a file with a password: AES-256-GCM, the key derived from the password by PBKDF2, the file read and written by pieces — up to 64 GB, without loading it in memory. A wrong password, or a single byte changed in the encrypted file, and the decryption refuses: GCM checks what it decrypts.
// wf_encrypt_file () (extract)
// AES-256-GCM, the key derived from the password : name.enc beside the file
ll_rc = inv_crypto.of_encrypt_file(/*password*/ ls_password, /*source*/ ls_path, /*target*/ ls_path + ".enc")
if ll_rc <> 0 then
	wf_log("[red]Not encrypted[/red] : " + inv_utils.of_escape_markup(inv_crypto.is_last_error))
	return
end if

// The proof : decrypted again, the copy has the same SHA-256 as the original
ll_rc = inv_crypto.of_decrypt_file(/*password*/ ls_password, /*source*/ ls_path + ".enc", /*target*/ ls_path + ".dec")
if ll_rc = 0 and inv_crypto.of_hash_file(/*algorithm*/ n_pbt_crypto.HASH_SHA256, /*path*/ ls_path) = inv_crypto.of_hash_file(/*algorithm*/ n_pbt_crypto.HASH_SHA256, /*path*/ ls_path + ".dec") then
	wf_log("[green]Decrypted[/green] : the copy is identical to the original (same SHA-256)")
end if
of_hash_file gives the fingerprint of a file — the way to check a download or to detect that a file changed.
Step 6 — A signed API token #
A web API often expects a JSON Web Token in its Authorization header: a few claims — who, for what, until when — signed so that nobody can change them. Signing one is one call:
// wf_issue_token () (extract)
// The claims of the token : who, and what for
lnv_claims.of_set_string(/*path*/ "sub", /*value*/ is_signed_in)
lnv_claims.of_set_string(/*path*/ "role", /*value*/ "orders.read")

// A JSON Web Token signed with the secret of the API, valid one hour : what an
// API expects in the header Authorization: Bearer
ls_token = inv_crypto.of_jwt_sign(/*algorithm*/ n_pbt_crypto.JWT_HS256, /*key*/ API_SECRET, /*claims_json*/ lnv_claims.is_text, /*expires_seconds*/ 3600)
lnv_claims is an n_pbt_json, the free JSON builder of the REST tutorial. The check is the API's job — or yours, for a token you receive:
// Checked as the API checks it : the signature, the algorithm, the expiry
ls_claims = inv_crypto.of_jwt_verify(/*algorithm*/ n_pbt_crypto.JWT_HS256, /*key*/ API_SECRET, /*token*/ ls_token)
lnv_read.of_load(/*json*/ ls_claims)

// One character changed in the signature : the token is refused, and the reason given
ls_forged = Left(ls_token, Len(ls_token) - 2) + "xx"
if inv_crypto.of_jwt_verify(/*algorithm*/ n_pbt_crypto.JWT_HS256, /*key*/ API_SECRET, /*token*/ ls_forged) = "" then
	wf_log("[red]Forged token refused[/red] : " + inv_utils.of_escape_markup(inv_crypto.is_last_error))
end if
The algorithm is required at the check, and compared with the one of the token: a token that claims another algorithm is refused. API_SECRET is a constant of the sample; a real application keeps it protected too — of_protect, step 4.
Deploying #
Next to your executable, ship:
my_app.exe
pbtoolboxai.dll     <- the x86 or the x64 copy, matching your build
Nothing else to install: the cryptography is that of the WebView2 engine and of Windows. The DLL has the same name in 32 and 64 bit. Call PBT_SetLicense with your key in the application open event, and the 2,048-character limit goes away.
Going further #
- Public keys:
of_generate_keypair(RSA, ECDSA P-256, Ed25519),of_signandof_verify— sign a file or a licence your application checks;of_rsa_encryptfor a secret only the server reads. - Tokens from an identity provider:
of_jwt_verify_jwkschecks a token against the public keys an OAuth server publishes. - Random values:
of_uuid,of_random_hex,of_random_passwordfor a temporary password. - Encryption of a text:
of_encryptandof_decryptby password,of_encrypt_with_keywith a key of 256 bits, in a format OpenSSL reads.
Every method is in the crypto reference.
And if you write PowerScript with Claude, Cursor or VS Code, connect them to the PBToolboxAI documentation MCP server: your assistant then looks up the exact API instead of guessing, and checks the code it proposes. The code of this tutorial was checked that way.
Download: the PBToolboxAI demonstration package — free: the library, the DLL, and the sample of this tutorial in the Tutorials tab of the demo.